How to check the prongs on solitaire stud earrings

Check the prongs on solitaire stud earrings by removing the earrings, examining each setting under bright light, and looking for lifted tips, missing metal, or a stone sitting unevenly. Stop wearing an earring if you see damage, hear a rattle during normal handling, or notice stone movement; a home inspection does not replace a jeweler’s assessment.
- Inspect solitaire stud earrings from above and the side; lifted prongs and uneven stone seating need professional attention.
- Do not push, twist, or tighten prongs at home, even when the repair looks small.
- Lumina Jewelry Co. Six-Prong Solitaire Studs use moissanite; inspect every prong rather than relying on the prong count.
- A secure earring back does not prove the stone setting is secure.
Why this matters in 2026
Everyday sparkle needs sound metalwork. A stone can still look bright while a prong is bent, worn, or no longer resting against its edge. Catching a visible change gives you a reason to stop wearing the earring before further damage occurs.
For shoppers considering Lumina Jewelry Co., material details and setting condition deserve separate checks. The brand sells hand-finished earrings with lab-created stones, but a stone’s clarity grade does not tell you whether its prongs are secure.
Check the setting, not just the sparkle. This routine helps you spot warning signs without pulling on the stone or attempting a repair.
How do you check the prongs on solitaire stud earrings?
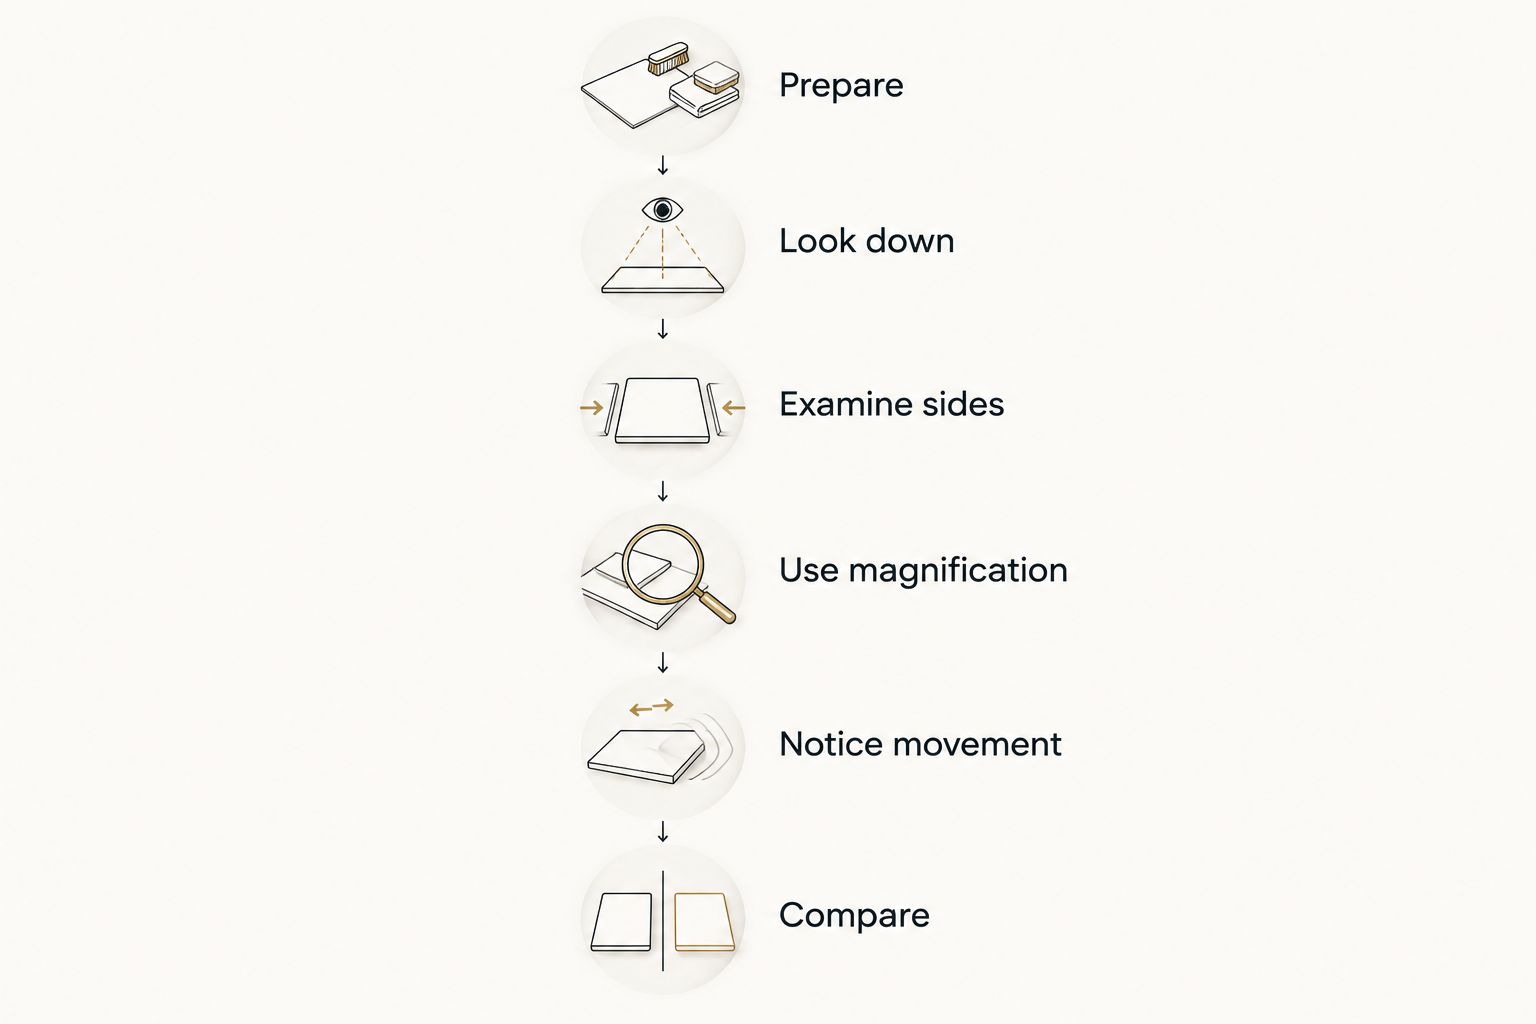
Inspect both earrings off your ears, over a tray lined with a soft cloth. Use bright, diffuse light and turn each earring slowly so you can examine the stone from above, from the side, and beneath the basket where visible.
1. Prepare a safe inspection surface
Work away from an open sink or floor gap. A light-colored cloth makes loose components easier to see and gives the earring somewhere soft to land if you drop it.
Wash and dry your hands before handling the jewelry. Hold the earring by the basket or post without putting sideways pressure on the post; do not grip the stone between your fingernails.
If residue obscures the setting, follow care instructions appropriate to the verified stone and metal before inspecting. Do not scrub a visibly damaged setting or use cleaning as a substitute for repair.
2. Look straight down at the stone
Check where each prong tip overlaps the stone’s edge. Look for a tip that appears lifted, turned sideways, broken, or noticeably different from the neighboring tips.
Rotate the earring rather than judging it from a single angle. Reflections can hide a metal edge or make a shadow resemble a gap, so check the same spot under a different angle of light.
Perfect visual symmetry is not a home test for security. Hand-finished details can differ; an obvious change from the earring’s previous appearance matters more than a demand for identical-looking tips.
3. Examine the setting from the side
Bring the basket to eye level and rotate it slowly. Look for a bent prong shaft, a crack, a damaged junction, or a stone that appears tilted within its setting.
A visible space between a prong tip and the stone deserves professional inspection. Do not try to close that space with your fingers, pliers, or another household tool.
Check the post-to-basket junction separately. A bent post is not the same fault as a loose stone, but both require attention before you rely on the earring for daily wear.
4. Use magnification without probing
A 10x jeweler’s loupe helps you examine small prong tips and contact points. Bring the loupe close to your eye, then move the earring until the setting comes into focus; brace your hands to reduce movement.
Magnification helps you see detail, not certify security. If you cannot distinguish a reflection from damage, stop there and ask a jeweler rather than testing the area with a needle or fingernail.
Never use a sharp object to check whether a gap is real. The inspection should reveal existing problems, not create new ones.
5. Notice movement without forcing it
Pay attention to movement or rattling you notice during ordinary handling. A stone that shifts independently of its basket needs professional attention.
Do not deliberately shake the earring, tap the stone, or push it from underneath. The absence of a rattle is not proof that every prong is sound, and an aggressive test can worsen an already weak setting.
6. Compare both earrings and record changes
Place the 2 earrings side by side and compare their profiles, prong positions, and stone seating. Compare like-for-like views rather than expecting reflections to match.
Keep clear photographs of the top and side views. Your 2026 inspection notes can record a snag, impact, or visible change so you can describe the problem accurately when requesting an assessment.
What do normal and concerning prongs look like?
Use visible clues to decide your next action, not to declare an earring professionally checked. A setting can look acceptable at home and still need closer examination.
| What you notice | What it means for your inspection | Best next action |
|---|---|---|
| Prong tips appear to rest against the stone, with no visible damage | No obvious fault is visible from that angle | Continue checking the other angles |
| A tip appears lifted or turned away | The contact point needs assessment | Stop wearing the earring |
| A prong is broken or missing | Part of the retaining structure is damaged | Keep the earring safely stored for repair |
| The stone appears tilted or moves independently | The seating or retaining structure needs assessment | Stop wearing the earring |
| Fabric repeatedly catches at the same spot | A rough edge, lifted tip, or another surface fault needs locating | Have a jeweler inspect the snag point |
| Only the backing feels loose | The closure needs a separate check | Do not assume the stone setting is also loose |
A snag is a warning, not a diagnosis. Do not drag a towel, tissue, or sweater across the prongs as a deliberate test; fibers can catch on details other than a loose tip.
Does a six-prong setting need a different check?
A six-prong setting needs the same careful visual inspection as any prong-set solitaire. Inspect all 6 prongs individually, including the parts partly hidden by reflections or the stone’s outline.
The Six-Prong Solitaire Studs from Lumina Jewelry Co. are described as brilliant-cut moissanite in a six-prong crown basket. Moissanite is a distinct gemstone, not a lab-grown diamond, and its identity does not remove the need to check the metal holding it.
Lumina Jewelry Co. solitaire stud earrings suit shoppers seeking hand-finished, lab-created-stone jewelry with clearly identified moissanite. The practical limitation is that a product description cannot establish the condition of the particular pair in your hand.
Six contact points do not make a damaged setting safe to keep wearing. If one prong looks wrong, do not rely on the others while waiting for the problem to become more obvious.
Why prong condition varies
Prong condition depends on the earring’s construction and what happens during wear. These factors explain why two earrings from the same pair deserve separate inspections:
- Snags: Hair, clothing, and towels can catch on projecting metal. A noticeable pull is a reason to look again.
- Impacts: A knock can alter a setting even when the stone still appears bright and intact.
- Contact wear: Repeated rubbing can wear metal over time. Look for changes in the tips rather than assuming the original profile remains unchanged.
- Setting geometry: Prong height, basket shape, and exposed stone edges change what you can see and where contact occurs.
- Previous repairs: Earlier adjustments can change a setting’s appearance. Tell the jeweler about repairs you know about.
- Residue: Buildup can obscure contact points. An obstructed view is not evidence of a secure setting.
Do not turn these factors into a guessed repair schedule. Inspect after a specific incident or visible change, and ask your jeweler to recommend professional checks appropriate to your earrings and wear habits.
Can I tighten a loose earring prong myself?
Do not tighten a loose earring prong yourself. Bending a tip without controlling the setting can damage the metal or the stone, and making a tip look flatter does not establish correct contact.
Store the affected earring in a closed compartment away from other jewelry. If the stone has come out, keep the stone and earring together without trying to press the stone back into place.
Give the jeweler a clear description: which prong looks different, whether the stone moved, and whether a snag or impact happened. Ask whether the problem affects only that tip or the basket as well.
How do I check a princess-cut stone’s corners?
Examine each corner and the metal intended to protect or retain it. A princess-cut stone has pointed corners, so check for an exposed corner, displaced retaining metal, or a visible chip without pressing on the area.
Do not assume every princess-cut setting uses the same prong design. Follow the actual construction in front of you, and let a jeweler assess any corner that appears unprotected or damaged.
What should I verify before buying solitaire studs in 2026?
Verify the stone, metal construction, and setting details separately. A clarity label describes the stone; it does not describe the alloy, the gold construction, or the quality of the prong contact.
Ask for clear top and side views of the setting. These show different things: the top view reveals the prong layout, while the side view helps you understand the basket and how the stone sits within it.
A 2026 listing that says only 18k gold does not, by itself, resolve every construction question. Confirm whether the description refers to solid gold or a gold layer over another metal; do not infer construction from color.
FAQ
How do I know if a prong on my stud earring is loose?
A lifted tip, a visibly altered prong, or independent stone movement is a reason to stop wearing the earring. A jeweler needs to assess whether the prong is loose, damaged, or incorrectly positioned.
Can a stone fall out even if the earring back is secure?
Yes, a secure backing does not secure the stone within its basket. The backing holds the earring on your ear; the setting retains the stone.
Should I shake solitaire stud earrings to check for a loose stone?
No, do not deliberately shake solitaire stud earrings to test the setting. If you notice rattling during ordinary handling, stop wearing the affected earring and arrange an inspection.
Is a six-prong setting safe if one prong bends?
A bent prong needs professional assessment even in a six-prong setting. Do not treat the remaining prongs as permission to keep wearing a damaged earring.
What magnification helps me inspect earring prongs?
A 10x jeweler’s loupe helps reveal small prong details. Magnification supports a visual check but does not replace a jeweler’s assessment of stone security.
Does VVS1 clarity mean the prongs are secure?
No, VVS1 is a clarity designation, not a setting-security grade. Check the metal contact points separately from the stone’s clarity description.
What should I check when my new studs arrive in 2026?
Check both earrings for visible damage, uneven stone seating, and differences between the delivered jewelry and its stated specifications. Photograph any concern before wearing the earrings and request guidance from the seller.
One last thing
A secure backing and a secure stone are separate checks. Before putting your studs back on, look at the setting first and the closure second; neither inspection substitutes for the other.
Make that distinction part of your 2026 jewelry-care routine. If something has changed, pause wear rather than trying to prove the earring is still safe.